Shop by Age


Instant Delivery
Leaps & Bounds - Cow Shape Sorter
5-in-1 Game | Stacking | Shape Sorting | Pretend Play | Learn Numbers
Age: 12 Months+
₹ 799.00
₹ 929.00
(14%)


Instant Delivery
Leaps & Bounds - Stacking Pot
5-in-1 Game | Stack in Order | Pretend Play | Sorting | Open & Close Pots
Age: 6 Months+
₹ 599.00
₹ 659.00
(10%)


Instant Delivery
Leaps & Bounds - Tummy Time Roller
2-in-1 Game | Roll | Squeaky Sound | Early Development
Age: 3 Months+
₹ 299.00
₹ 329.00
(10%)


Instant Delivery
Leaps & Bounds - Nesting Doughnuts
2-in-1 Game | Pretend Play | Nesting | Open & Close Pots
Age: 12 Months+
₹ 299.00
₹ 329.00
(10%)


Instant Delivery
New launch
Sticker Fun - Hair & Make up
Reusable Stickers | Hair & Make Up | Pretend Play | Perfect Gift For Girls
Age: 3 Years+
₹ 539.00
₹ 599.00
(11%)


Instant Delivery
New launch
Jelly Stickers - Ocean
Jelly Stickers | Ocean Theme | Window Art Fun | Glass Painting
Age: 3 Years+
₹ 299.00
₹ 349.00
(15%)


Instant Delivery
Mirror Mosaic - Animals
450+ Stickers | 5 Templates | Perfect Travel Kit
Age: 3 Years+
₹ 349.00
₹ 379.00
(8%)


Instant Delivery
DIY Celebration Kit
13 DIY Activities | 500+ Craft Supplies | Creative Play
Age: 5 Years+
₹ 1,799.00
₹ 2,049.00
(13%)


Instant Delivery
Bestsellers
Mapology India Map Wall Chart with Reusable Stickers
India Map | Wall Chart | Reusable Stickers | 5 Ways to Play
Age: 5 Years+
₹ 769.00
₹ 899.00
(15%)


Instant Delivery
DIY Princess Craft Kit
DIY Princess Activity | Unique Play Patterns | Perfect Gift
Age: 5 Years+
₹ 749.00
₹ 849.00
(12%)


Instant Delivery
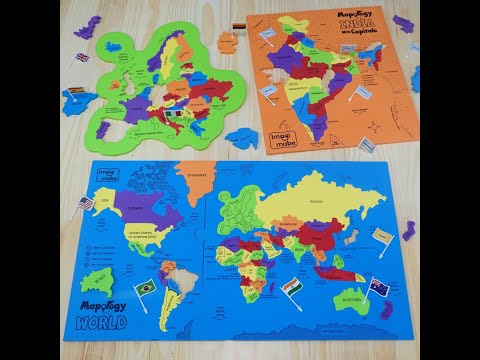
Mapology Combo: Map Puzzle of India and World with Capitals and Flags of Countries
Explore India & World | Learn Flags & Capitals | Play & Learn
Age: 5 Years+
₹ 999.00
₹ 1,119.00
(11%)


Instant Delivery
New launch
Mystery Mosaic - Patterns
Paint by Numbers | Travel Friendly | Endless DIY Fun
Age: 10 Years+
₹ 799.00
₹ 899.00
(12%)


Instant Delivery
New launch
Rainbow Loom - Glow in the dark
Bracelet Making & Charms | Glow In The Dark| Endless DIY Fun
Age: 7 Years+
₹ 449.00
₹ 499.00
(11%)


Instant Delivery
Indian Art Forms
Learn 5 Traditional Art Forms | 20+ Projects | Creative Play
Age: 8 Years+
₹ 1,199.00
₹ 1,299.00
(8%)


Instant Delivery
Shark's Choice
Mapology India With Flags and Flash Card
Learn 200+ Facts | Swipe & Reveal Flashcards | Play & Learn
Age: 8 Years+
₹ 649.00
₹ 749.00
(14%)